Thursday, December 23, 2021

These Sweet Little Dolls

So I've been looking and did find some yarn head doll parts. They can range in price from less than three dollars apiece up to twelve dollars for one set. You have to shop around. I got about eight of these for about three dollars apiece in two different sizes so far. I need some more larger heads for my patterns. 


That's about the right price for 1980's doll heads. The smaller ones went for about a buck and a half with the large ones at three to four dollars a set back in the day. 


I am enamored with these dolls. They have the sweetest faces but I think they all need new hair styles. I don't care for the mop look so I'm playing around with changing their hair and colors a little. 


It's not that hard to re-root the hair on these. I just cut the loop end half off of a large eyed needle and use it to push the yarn through the holes. Once I get the hair all set in, then I use a good flexible craft glue poured to the inside of the head and rolled around to catch the thread ends and then I let it dry. These dolls should never be washed in a machine or soaked in water, only surface and hand washed if needed.


These faces really are sweet and it's addictive to make these dolls. It's almost as addictive trying to find the right colors and sizes of parts to make them. I brought in last year making LCR dolls and I'll probably be making these for a while. It's a pretty good way to bring in a new year. 


Thursday, December 9, 2021

Old Patterns & Christmas Surprises

So I went up in the attic to get some ornaments down for the tree and ran across a box of old patterns and yarn that belonged to my Mom. I also found an afghan and brought down some vintage dishes I also found. There were about a dozen or so skeins of yarn, an old copper bottom pan that needed cleaned up and a corelle ware gold butterfly patterned large serving bowl. I remember that pattern from the 70's. I used to have a set of dishes with that pattern.


I made one of the doll dress patterns and just crocheted the head and hands because they are vintage vinyl doll sets and you can hardly find them anymore unless you want to pay out the wazoo for them. They are rare and expensive. This pattern is called "Bubble Gum".


I remember back in the 80;s when she made those dolls. They were pretty popular dolls around the crochet crowd. You could say they had a following way back then.


It turned out cute but I still want the vinyl ones so if and/or when I get them, I will be swapping them out but until then, my doll has a face and hands. I want to make some more because the patterns go pretty fast but I need some head and hand sets. I even thought about sculpting a head and making a mold but that takes a lot of time. Maybe after Christmas. 


Oh, I did shine up that old pot and guess what? It's a 2 qt Revere Ware pot, stainless steel with copper clad bottom and those things last forever. 

I wish I had done a "before" and "after" picture cause I got it looking pretty good with salt and vinegar. And you can call it coincidence but I went to the thrift store a few days later and found another pot a little bigger and with a lid and brought it home for five bucks. I almost didn't get it because it was so grungy and blackened that I couldn't even make out the stamp on the bottom. But after I cleaned it up it was "Revere Ware" too. I did some research after that.

The one at the thrift store was older and worth a lot more than the one in the attic. So now I'm a Revere Ware collector too.

Those are just a few of my Christmas presents so far. Gee I miss my Mom. I can't help but think she wanted me to find this stuff this year. It's been in the attic for over 15 years. 

You never know where the blessings will come from.


Tuesday, November 30, 2021

Making "Designer" Hats

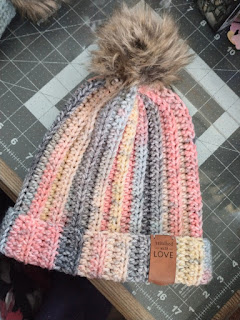
So I've been seeing a lot of "designer" hand knits and crocheted winter items lately. They look really nice and professional with their little faux leather tags on the brims and their little faux fur pom-poms on top. So I decided to make something that I would be proud to give away too.


Ta-da! You don't really need a pattern to make these. I used my head (literally - I measured it) to figure out the right length and width using regular 4 ply worsted weight yarn because that's what I have a lot of and I didn't want to have to go buy a bunch of yarn. Basic pattern instructions included below. Adjust to fit your head. 


I've been wanting to make some hats. First I tried making beanie type hats on my Innovations circular knitting machine and honestly, they all look pretty plain and way too small. I think I need a better machine with a few more needles. I'm saving up for a Sentro. It has 48 needles and mine only has 44. The hats made on them all have the same gauge, stripes etc... so they all look basically alike and there's not much you can do to fancy them up. And if you double them up for a reversible hat, they take an incredible amount of yarn. It doesn't take that much more time to just crochet one. And you have so many more pattern options with crochet and a big hook. You can get a hat done with one skein of yarn and just a few hours.

But I really like making them on the machine but - my machine makes them too small to easily stretch over an adult head and I would not be very proud to give them away as a gift. They just don't fit a normal head. It's not going to go to waste though. I'm going to make more of them and turn them into slippers and/or fingerless gloves.


But I really like the chunky and knitted look you get when you crochet in the back loop of stitches for hats. The slate blue one is made with 40 stitches and 40 rows for a large and/or male head. You can adjust it to 42 stitches for a longer hat. The pastel hat is 40 stitches and 38 rows for a small/med size adult head. You have about 1-3 inches of stretch to play with to make the hat fit just right. It's not an exact science but a hat should be snug but not tight. You just have to try it on to see if it's right. To make a child's hat just shorten the rows and maybe some of the length. 

I was pretty sneaky this year. I made a few hats in different sizes and then as I showed them to my potential recipients to help me test out my pattern, I had them try them on and tell me which size fit better... 


And I can make my own pom-poms although you can buy them online too if you don't want to make them. I have lots of faux fur from previous projects. 


I cut a 3-1/2" X 7" piece of fur and do a running stitch around the inside 1/4" in from the edges and gather it up. Use a strong thread like a double strand of quilting thread or a light cord so it doesn't break when you pull it up tight. Then I lightly stuff it with poly-fil. I sew the gather closed and attach the middle of a 12" chain of yarn for sewing onto the bottom center of the pom-pom.


Then push the ends through two different holes in the work and tie a bow on the inside. That way it can be removed if you want to wash the hat in the machine. I always hand wash my hand made knitted and crocheted items and line dry.

I got the little faux leather labels from Hobby Lobby but you can special order them online if you have a brand you want to imprint. You might be able to make some by hand or on a Cricut.

I will probably make a few more and maybe work out some fingerless gloves and a few scarves to match before Christmas. I don't feel rushed and quick projects give you plenty of time.


Sunday, November 21, 2021

Designing Bears and Bunnies

I just wanted a way to make a bunch of little 9" stuffies really quick. That's how it all started. I love knitting and crocheting but crochet hurts my hands and knitting is beautiful but it takes up way too much of my time for each little animal. When you're my age, three days on one little project is just too long. 


You can't knit quicker than on a knitting machine so that's what I used. I've had these machines for a few years but haven't used them in a little while. I actually made a bear in less than two hours on the small machine and I was hooked on making them from there on.  It's instant gratification and I don't want to knit with two needles anymore... or for at least a while longer.


So I made a bunch of bears and named them the "Ice Cream Colors" set. Than I used another sparkle cake yarn and named them "Crayon Colors" set. Then Christmas started bearing down on me (no pun intended) so I made a set of "Christmas" bears too. I didn't want to get burnt out on bears so a bunny popped into my head and that's where we are now.


I'm designing bunnies on the Addi. I also utilize a small amount of crochet pieces on them too because you can do most all of it except for the smallish pieces - all on the Addi. I found a way. I also do a little bit of hand stitching on them too, but you have to do that regardless.


Do I consider circular machine knitting "hand knitting"? Yes I do and I'll tell you why. Regardless of whether you knit with two straight needles, round needles, a loom, or you crank a set of plastic needles in the round... you are hand knitting with another instrument, regardless of what form that takes. You move the yarn in and out of the needles by hand. 


Otherwise to be truly a "hand knitter" in the purist sense of the word - you have to only use your fingers to knit. But I enjoy it all. All the yarns, all the tools and all the machines. There really is no limit to what you can make. 


Saturday, November 13, 2021

Working on Christmas Bears

I'm still going on these cute little bears although I am getting other things done at the same time. I finished a LCR cable knit Christmas sweater that I started several days ago.  I only have six more blocks to go to finish up my granny square lapghan and I'm going to be making some ear warmers, hats and scarves on my Innovations machine soon. I'm running out of brown fleck yarn so I need to get some more of that.


The Christmas bears I'm working on now look a little different from the original pastel bears because I'm always trying to improve and make changes to them. I have used knitted sweater pieces for some of the neck scarves. They are beautiful fibers that come from pre-made sweaters.


What? Yes, and if I can't unravel them to re-use the yarn then I cut them up in scarf pieces for my bears. Some of these knits are made with beautiful yarn that I can't find in the stores any more. I like sparkly, sequined and fuzzy textured yarn. 

I have also come up with some instructions for adding pants to the bears although I like them just fine without pants. To add pants to a bear - on the body section knit 12 rounds in pants color, 46 rounds in bear color and the last 12 rounds in pants color instead of 70 rounds in one color. Mark the 35th round for the middle. And on the legs knit 9 rounds in pants color and 4 rounds in bear color for each leg.


Saturday, November 6, 2021

Bears and More Bears

So I've been making a few more bears and timing how long it takes me to get each piece done. I am really loving these little bears. I can get two or three of these done a day from start to finish if I really work at it. It takes me three to four days to make one Little Cotton Rabbit knitted bear and clothes depending on how detailed I make the clothing.


I have a couple of Mandala sparkle cake yarns that are a 3 weight and these are perfect for using that yarn on the clothes. It makes up really soft and loose and snuggly wuggly. I'm loving the way the sweaters look.


I use some techniques to get the bears shaped the way I want them that are not normally knitting techniques. I haven't seen anything like my bears made the way I make them on any site. I think they are unique. I haven't decided what to do with them yet. 


For right now I'm enjoying making them and the whole design process - different sizes, colors, etc. I haven't written the instructions out yet because I'm still working on tweaking the rows, stitches and looks of everything until I'm happy with all of it. I don't have a timeline for getting them done.


Thursday, November 4, 2021

It's Not Cheating to Use a Machine

I was moving right along finally making good progress with my afghan and soft knit toys when I ran across a beautiful hand knitted Christmas wreath online and wanted one... bad enough to make my own. So I dragged out my Addi express machine and got busy. 


Then the thought popped into my head that maybe little bears and other animals could be made on the small Addi... hmmm... I couldn't find a pattern with arms and legs. I found all kinds of patterns for the Addi for animal heads but it seemed like nobody wanted to make the bodies and limbs to finish them up. So I got busy and figured out how it could be done - and still look cute. Cuteness was the big factor. I knew it would be such a time saver. How many of these could you crank out in a day? I know, right! It took me two to three days to make a knitted LCR bear and I just didn't have that kind of time with Christmas coming. I love making them but they do take a while.


And a lot of trial and error and several hours later, I came up with a bear that I absolutely love. There are some special techniques that I used to make him look right. The arms and legs are rolled up and then sewn so there is no batting or stuffing in them. They don't need it. The head and body is made in one piece and doubled so no stuffing shows through since the needle gauge on the Addi is much larger than the small needles I usually use by hand. You double it up just like you would make a beanie hat. I only crocheted the muzzle and tail on this little guy.


The pieces went quick on the machine but it did take a while to sew him together and finish him off. I embroidered the nose and mouth. I used plastic safety eyes but you could embroider them. I scribbled row counts and instructions as I went so I'll have to sort them and write them out at some point and make a hand knit version for those who don't have an Addi but seriously - why not use a machine instead of taking hours to make these by hand? And I love to hand knit too but it's not cheating to use a machine. You use a sewing machine to sew don't you? It's a time saving device. 

Many people use these machines to crank out dozens of animals, socks, hats and scarves to donate to hospitals, the homeless, underprivileged kids, firemen and the police for kids in distress. 

We don't have to cook over open fires any more either... and I'm glad about that too.  


Monday, November 1, 2021

Colorwork Dress

I ran across these little colorful dress pattern modifications on Ravelry by suzymarie. They are for LCR knitted animals. I just had to make a few. This one reminded me of stained glass windows. I did modify the pattern a bit for my colors.


This is my very first LCR animal that I knitted so I used her for a model. 


These colorwork dresses take a little time to make because of all the different colors and intricate patterns. You really have to pay attention on these. 


So cute! This is a well dressed bunny girl.


Thursday, October 21, 2021

Ghost In The Machine

I usually skip right over Halloween but when I saw these graphics, I had to make them. They are so darn cute without being too cartoonish. 


I discovered this artist while perusing through Etsy looking for Christmas miniatures. They are from Susan Hoerth of Hoerth Studio in McAllen, Texas with raidersofthelostart as her Etsy screen name. She's terrific. Go look at her stuff and you'll see what I mean. I've made my share of decorative books and journals so I wanted to make some of these. I love paper crafts.


I haven't used my glitter glue in a while but I really wanted a slick black glitter to accent these pieces with and to get that I first used glitter glue and went over it when dry with Glossy Accents or put down Glossy Accents first and then sprinkled glitter over it while it was still wet. It just depends on how shiny you want it to be.


It gave me exactly what I was wanting. I could complain about all the little pieces I had to cut out but I found I could take a 6 x 9 .png (transparent background) of the pieces I want to use and import the sheet into my Cricut and use the 'print then cut' feature and let the machine do all that work for me. 


I don't know how everyone else uses their Cricut but I use mine most of the time to print and cut graphics for my projects after working with them in PhotoShop or Gimp. I love that feature of Cricut. 


So I wound up doing three little folding book projects with these graphics while dealing with a loudly rattling computer off and on for two days. My computer is about six years old and I've already replaced a fan and two memory modules recently. I decided to upgrade my hard drive with a solid state disk drive since the old one was rattling. It sounded like grinding gears... and got on my last nerve. I was trying to hurry up and finish my project and get everything printed off before it crashed. 


I'm a little bit of a geek so I decided to get in there and find out what was going on and just fix it if I could. I though it was a bearing on a fan since I have three of them on board but when I popped the cover, the noise was coming from my hard drive... YIKES! That meant I had to hurry if I wanted to clone it to another drive. Cloning it means I don't have to reinstall Windows and all my programs. This is the easiest and quickest way really. As long as you have a working hard drive, you can clone it. It's too late after it fails. If it's already grinding, you are on borrowed time and you better get busy fast.


So I researched through the screeching noise and found this resource on YouTube to help me fix it.

Explaining Computers


Yes, I had to open the machine again. It's amazing how much dust it can collect in just a few months. Another cleaning. I cloned the hard drive from a writable disk to SSD and I decided to go from 1 terabyte to down to 500 gigs. That seems like a downgrade but it's not since I only used about 127 gigs in the last six years. I don't need all that extra room. I have a gaming computer but I'm not a gamer. It's got a kick arse graphics card though. I store my graphics library on a backup external drive and pull off collections onto DVD for a backup of my backups. Never store anything important on your computer's hard drive because hardware failure is imminent, not "if" but "when". 


So I got rid of the loud screeching and clattering noises, upgraded my hard drive to solid state which makes it noticeably quicker and the ghost in the machine is happy once again. True story.


HAPPY HALLOWEEN !!!


Thursday, October 14, 2021

Toy Store Preview

What have I gotten myself into now? A new project of course! I usually skip over Halloween, my kids and grandkids are grown and my young grandkids are two thousand miles away so I don't get into it any more. We have not had trick or treaters for several years now. 


Add that all together and I start crafting Christmas sometime in October.  So when I saw this project I thought about it for several months before I decided that I would give it a go. 


There were no instructions for making it except to point you toward pre-made chipboard kits. I like to craft from scratch whenever I can. I would have loved a set of plans to save me time and money.


So at least I had the rough dimensions of the project to make my own. I had some finishing plywood left over from other dollhouses I've made so that's what I used.  And a lot of cardboard and some pressed board in places. I made the front 10" x 12" and the sides finished out to be 10" x 5-1/2". The base was 10" x 7-1/2".  

Some of my previous projects are on an older blog here . I have too many hobbies to keep up with a blog site for each one so this year I decided to combine all my projects into just this one blog.


The bay windows were a little tricky for me and very, very detailed. They were a pain because they had to be precise to fit and look right. I made them out of cardboard and card stock covered with paper.


This project is from Artfully Musing by Laura Carson. You can get the digital print files from her site or on Etsy very reasonable. 


There are several sheets you can use for materials to make this but you have to have the Toy Shop graphics for the building  And you will want to also get some toy prints and people for your store. I don't think you can start too early on this project. A lot of things you will have to figure out or make on your own. I tried to stick to the original as much as possible but I did add my own little touches. You can add different types of lighting if you want. There are so many options available now. 

This project will keep you busy with all the details. This is such a large project that I will have to post it in pieces with all my tips and tricks as I move along on it. 


I had to buy very little because after years of crafting and doing artwork I actually have supplies like a mini craft store in my room. What I did buy, I got at the Dollar Tree. I've spent about four days on it so far. I'm totally obsessed with it and was up until two o'clock working on the details last night/this morning. Time just got away from me! So you better get started if you're hoping to get this project done soon.

After all, Christmas is coming!


Friday, October 8, 2021

Busy, Busy Kitties

I ran across these patterns while searching for other soft dolls to knit and I fell in love with them. This is the first out of five patterns by Alan Dart called "Kitty's Knit Klub.


I can relate to each and every one of them although I don't belong to any knit clubs around here. Cute, cute, cute is how I would describe these.


I did have a little trouble and had to re-do the stripes on her head. I didn't like the chain stitch ones and the darker ones didn't look right. I settled for just plain yarn stripes.


I think they look better when you color the cheeks and ears with chalk. It gives them a little depth.


I also had trouble with the bow. I made my own pattern on that. Didn't like the way the one in the instructions looked and I found the pattern a little lacking in detailed instruction. You better know how to knit and put things together before you start this one!


I got everything done but saved the skirt for last. Ribbed stitch is not my favorite stitch to do so the skirt was torture for me but I eventually got it done. I took a lot of breaks and made other stuff in-between the row making.


I will make the other cats maybe changing a color or two here and there. I have some pretty variegated cat colored yarn I want to use up and that black cat will probably turn out to be a tuxedo like the one I have, Mr. Baby. He's my real cat.