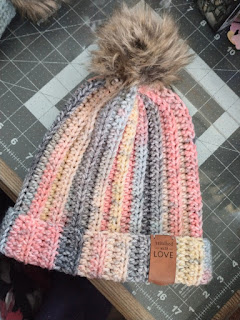
So I've been seeing a lot of "designer" hand knits and crocheted winter items lately. They look really nice and professional with their little faux leather tags on the brims and their little faux fur pom-poms on top. So I decided to make something that I would be proud to give away too.
Ta-da! You don't really need a pattern to make these. I used my head (literally - I measured it) to figure out the right length and width using regular 4 ply worsted weight yarn because that's what I have a lot of and I didn't want to have to go buy a bunch of yarn. Basic pattern instructions included below. Adjust to fit your head.
I've been wanting to make some hats. First I tried making beanie type hats on my Innovations circular knitting machine and honestly, they all look pretty plain and way too small. I think I need a better machine with a few more needles. I'm saving up for a Sentro. It has 48 needles and mine only has 44. The hats made on them all have the same gauge, stripes etc... so they all look basically alike and there's not much you can do to fancy them up. And if you double them up for a reversible hat, they take an incredible amount of yarn. It doesn't take that much more time to just crochet one. And you have so many more pattern options with crochet and a big hook. You can get a hat done with one skein of yarn and just a few hours.
But I really like making them on the machine but - my machine makes them too small to easily stretch over an adult head and I would not be very proud to give them away as a gift. They just don't fit a normal head. It's not going to go to waste though. I'm going to make more of them and turn them into slippers and/or fingerless gloves.
But I really like the chunky and knitted look you get when you crochet in the back loop of stitches for hats. The slate blue one is made with 40 stitches and 40 rows for a large and/or male head. You can adjust it to 42 stitches for a longer hat. The pastel hat is 40 stitches and 38 rows for a small/med size adult head. You have about 1-3 inches of stretch to play with to make the hat fit just right. It's not an exact science but a hat should be snug but not tight. You just have to try it on to see if it's right. To make a child's hat just shorten the rows and maybe some of the length.
I was pretty sneaky this year. I made a few hats in different sizes and then as I showed them to my potential recipients to help me test out my pattern, I had them try them on and tell me which size fit better...
And I can make my own pom-poms although you can buy them online too if you don't want to make them. I have lots of faux fur from previous projects.
I cut a 3-1/2" X 7" piece of fur and do a running stitch around the inside 1/4" in from the edges and gather it up. Use a strong thread like a double strand of quilting thread or a light cord so it doesn't break when you pull it up tight. Then I lightly stuff it with poly-fil. I sew the gather closed and attach the middle of a 12" chain of yarn for sewing onto the bottom center of the pom-pom.
Then push the ends through two different holes in the work and tie a bow on the inside. That way it can be removed if you want to wash the hat in the machine. I always hand wash my hand made knitted and crocheted items and line dry.
I got the little faux leather labels from Hobby Lobby but you can special order them online if you have a brand you want to imprint. You might be able to make some by hand or on a Cricut.
I will probably make a few more and maybe work out some fingerless gloves and a few scarves to match before Christmas. I don't feel rushed and quick projects give you plenty of time.


No comments:
Post a Comment